



Table of Contents
- What Determines Excavator Bucket Teeth Replacement Frequency
- Signs of Worn Bucket Teeth You Should Not Ignore
- Excavator Bucket Teeth Wear Patterns: A Visual Guide
- How to Change Excavator Bucket Teeth: Step-by-Step
- Maintenance Tips to Extend Bucket Teeth Life
- Premium vs Standard Teeth: Cost-Benefit Analysis
- Consequences of Running Worn Bucket Teeth Too Long
- Frequently Asked Questions
Last Updated: September 2, 2026
What Determines Excavator Bucket Teeth Replacement Frequency
Bucket teeth replacement is one of the most critical maintenance decisions an excavator operator makes, yet it's inconsistently handled on most worksites. Ground engaging tools are consumables. Treating them as anything else is costly.
The right replacement cycle depends on soil type, operating hours, operator technique, and tooth material. There is no single universal answer, but clear benchmarks guide experienced operators.
Soil Composition and Abrasive Materials
Soil composition is the single biggest driver of bucket teeth wear rates. Soft, loamy ground is relatively forgiving. Rocky soil, granite, compacted gravel, and abrasive sandy substrates accelerate wear dramatically. According to Engineers Australia's technical guidance on ground engaging tools, abrasive index ratings for different soil types can vary by a factor of ten or more, directly translating to proportional differences in tooth life.
A practical rule: the more abrasive the material, the shorter your inspection intervals should be. Operators working in granite or compacted rocky soil should inspect teeth every 100-150 hours. Softer ground conditions allow for longer intervals, typically 200-250 hours between inspections.
Operating Hours and Replacement Cycles
Most manufacturers suggest a replacement cycle of 400-600 operating hours for standard teeth under moderate conditions. Heavy demolition work or excavating through highly abrasive materials can reduce effective tooth life to 200-300 hours. Light earthmoving in soft soils may extend useful life beyond 600 hours.
Treat operating hours as a checkpoint trigger, not a hard deadline. At 200 hours in abrasive conditions, conduct a detailed inspection. At 400 hours in any condition, evaluate whether teeth are still fit for purpose.
Signs of Worn Bucket Teeth You Should Not Ignore
Worn bucket teeth are identifiable well before total failure, which is why so many operators miss the replacement window.
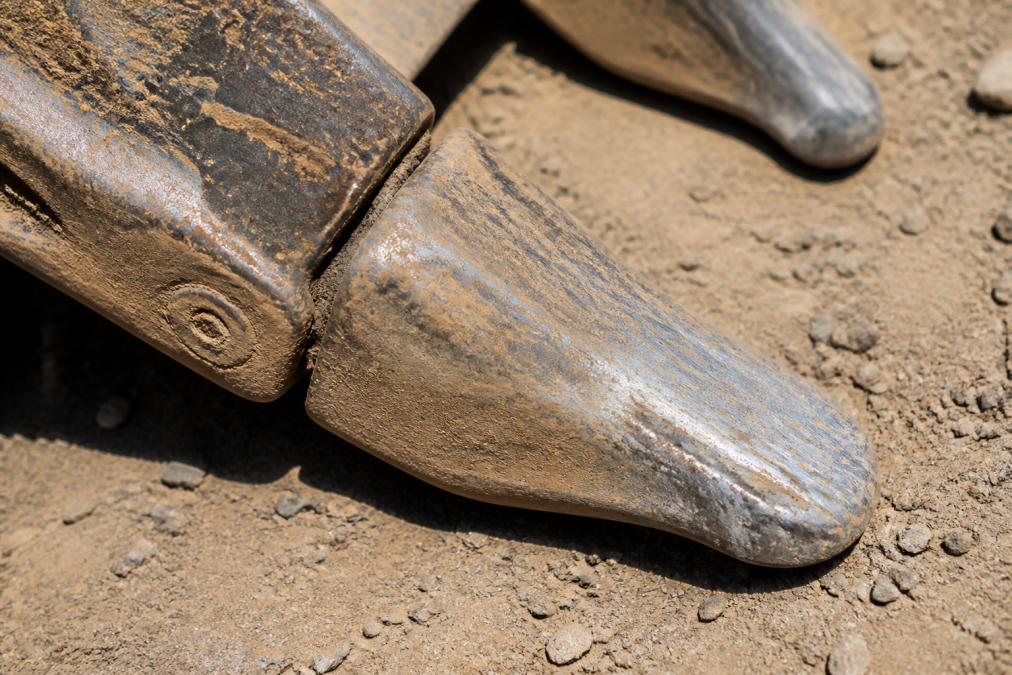
The most reliable indicators of worn bucket teeth include:
- Blunted or rounded tip: A sharp tooth penetrates cleanly. Once the tip loses its point, you're pushing material rather than cutting it.
- Visible metal loss at the shank: Wear progressing past the tip into the shank body indicates the tooth has operated past its useful life.
- Increased fuel consumption: When teeth lose their cutting edge, the machine works harder to achieve the same penetration.
- Reduced penetration efficiency: The bucket needs more force to enter the ground; what once took one pass now takes two or three.
- Loose fit or visible play in the adapter: A rocking tooth indicates the locking pin or retainer has worn or failed.
- Debris buildup in the socket: Compacted material between tooth and adapter causes uneven loading, accelerating wear on both.
Worn teeth damage compounds: a 20% worn tooth makes the adapter work harder, accelerating adapter wear, which then makes the next tooth wear faster. Catching wear early breaks that cycle.
Excavator Bucket Teeth Wear Patterns: A Visual Guide
Understanding wear patterns helps diagnose not just when to replace, but why wear is occurring.
Centre-tip wear is most common. The tooth point wears symmetrically from standard digging. When the tip rounds to a hemisphere, replacement is due.
Asymmetric or one-sided wear indicates the tooth is not sitting squarely in the adapter, usually caused by a worn adapter socket or incorrectly seated locking pin. Check the adapter and seating geometry before fitting replacement teeth.
Base or shank wear means the tooth has run too long. Wear has progressed past the tip into the body, risking accelerated adapter damage.
Flared or mushroomed tip occurs when tooth material is too soft for the application. The tip deforms under impact rather than wearing cleanly, a tooth specification problem, not just a replacement timing issue.
Troubleshooting Adapter and Shank Wear
Adapter wear is where the real cost lies. A worn adapter will destroy new teeth faster than the old ones wore out.
Signs of adapter wear include visible rounding of the socket opening, difficulty seating new teeth, and teeth that feel loose immediately after installation. Inspect the adapter seat, retainer groove, and locking pin channel every time you change teeth. As documented in Safe Work Australia's guidance on heavy equipment maintenance, ground engaging tool failures are a documented contributor to worksite incidents.
Replace adapters when the socket has worn beyond manufacturer tolerance, typically when the seat shows visible rounding or the retainer no longer holds the tooth firmly. Running new teeth on a worn adapter is false economy.
How to Change Excavator Bucket Teeth: Step-by-Step
Changing excavator bucket teeth is straightforward, but doing it correctly matters. A poorly seated tooth or worn adapter will create problems within hours.
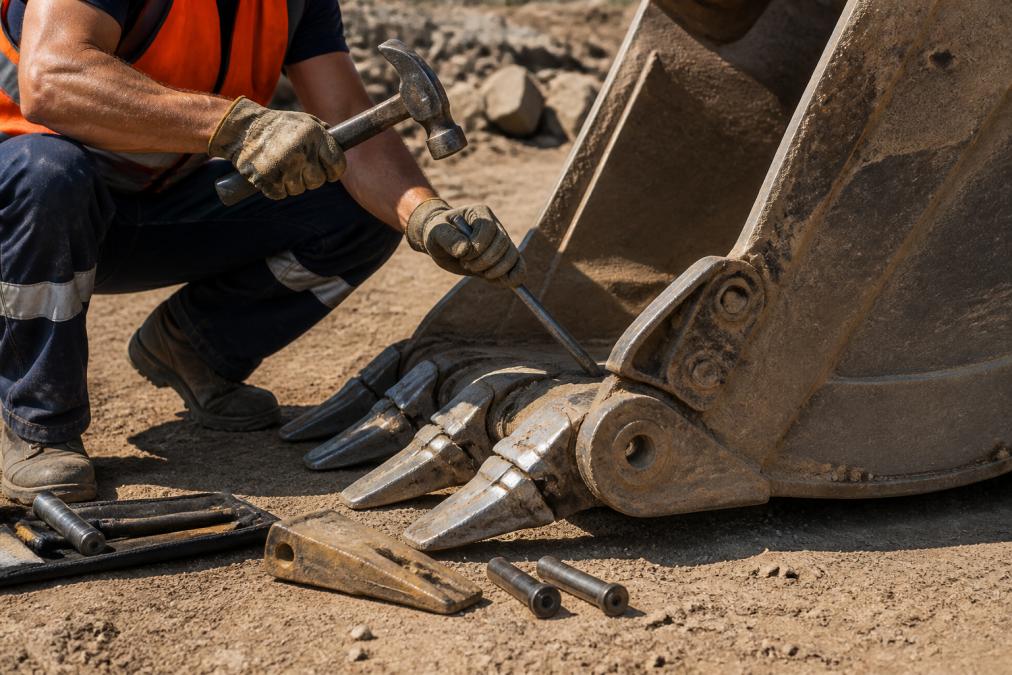
What you'll need: Hammer, pry bar, punch or drift pin, replacement teeth, new locking pins and retainers, wire brush, safety glasses, gloves.
- Lower the bucket to the ground and shut down the machine. Never work on teeth with the bucket suspended. Engage the machine's safety lockout.
- Put on personal protective equipment. Safety glasses and heavy gloves are non-negotiable.
- Remove the locking pin. Use a punch and hammer to drive the locking pin out of the adapter. Apply steady, directed force.
- Remove the worn tooth. With the pin out, the tooth should slide or lever off. Use a pry bar if seized.
- Clean the adapter socket. Use a wire brush to remove all debris, rust, and compacted material. Inspect for wear.
- Inspect the shank and retainer groove. Check for wear and confirm shank geometry is within tolerance.
- Fit the new tooth. Slide it onto the adapter shank. It should seat firmly with no visible gap at the base.
- Install a new locking pin and retainer. Drive the pin until it seats fully. The tooth should have no lateral movement.
- Verify the fit. Attempt to rock the tooth by hand. There should be no play.
- Repeat for all teeth. Replace side cutters at the same time if they show wear.
Maintenance Tips to Extend Bucket Teeth Life
The right maintenance habits meaningfully extend replacement intervals.
Match tooth specification to the application. A general-purpose tooth in rock-breaking work will wear out in half the time of a purpose-designed rock tooth. Tooth geometry and material hardness matter.
Maintain correct bucket angles. Operating at extreme angles puts asymmetric load on individual teeth and accelerates one-sided wear.
Inspect teeth as part of daily pre-start checks. A quick visual inspection takes two minutes and catches loose pins, cracked teeth, and early-stage adapter wear before they become expensive problems.
Rotate teeth if your design allows. This evens out wear across the full set and extends the interval before full replacement is needed.
Address rust prevention on stored equipment. A light coating of grease in the socket before storage prevents moisture ingress and rust formation.
According to Queensland Department of Transport and Main Roads' equipment maintenance standards, documented maintenance schedules are a factor in equipment compliance assessments for civil contractors on government projects.
Premium vs Standard Teeth: Cost-Benefit Analysis
The cost-benefit calculation for premium versus standard bucket teeth comes down to wear rate, replacement frequency, and machine downtime. Premium teeth typically use higher-grade steel alloys or tungsten carbide inserts providing greater impact resistance and hardness.
If premium teeth last 40% longer than standard teeth in your application and cost 25% more, the premium option is better value. The calculation shifts further in favour of premium when accounting for machine downtime during tooth changes. Every replacement takes the machine off the dig for 15-30 minutes.
Premium teeth that maintain a tighter fit for longer also protect adapter life. Replacing an adapter is significantly more involved than replacing a tooth.
For high-utilisation machines in abrasive conditions, the case for premium GET is strong. For light-duty applications in soft ground, standard teeth may offer adequate performance at lower cost.
Factor |
Standard Teeth |
Premium Teeth |
|---|---|---|
Upfront cost |
Lower |
Higher |
Wear rate in abrasive conditions |
Faster |
Slower |
Replacement frequency |
Higher |
Lower |
Adapter protection |
Moderate |
Better |
Best for |
Light-duty, soft ground |
High-utilisation, rocky or abrasive ground |
Consequences of Running Worn Bucket Teeth Too Long
Most operators know they should replace worn teeth. The ones who push the interval too far usually do it because teeth haven't fully failed or a replacement set isn't immediately on hand. The downstream consequences are worth understanding clearly.
Increased fuel consumption. A worn tooth that can no longer penetrate cleanly forces the machine to work harder. On a machine running eight to ten hours a day, this adds up quickly.
Accelerated adapter wear. A tooth that has lost its tip no longer loads the adapter correctly. The geometry changes, contact points shift, and the adapter socket begins to wear asymmetrically.
Reduced productivity and project delays. Poor penetration efficiency means more passes per cubic metre of material moved.
Structural risk to the bucket. A tooth worn down to the adapter or fractured can damage the bucket lip or shell. Bucket structural repairs are significantly more expensive than a tooth replacement cycle.
Environmental impact. Worn teeth that force the machine to work harder increase fuel burn and emissions per tonne of material moved.
The cost of running worn teeth is always greater than the cost of replacing them on schedule.
Bucket teeth replacement is a routine task, but decisions around timing, specification, and adapter maintenance have real impact on machine performance, operating costs, and project outcomes. Earthmoving Warehouse offers a comprehensive range of excavator bucket teeth and compatible adapters, with expert technical support to help you select the right specification for your machine and application. Request a price or speak with our team to get the right teeth on your bucket before the next shift.
Frequently Asked Questions
How often should excavator bucket teeth be replaced?
Bucket teeth replacement frequency varies widely depending on soil conditions, tooth material, and how the machine is operated. In soft or loamy ground, teeth can last 500 to 1,000 operating hours. In rocky or highly abrasive ground such as granite or compacted gravel, that figure can drop to 200 to 400 hours. Inspecting teeth every 50 to 100 hours and replacing them at the first signs of blunting or cracking is the most reliable approach to maintaining penetration efficiency and protecting adapters.
Does soil type affect how often I need to change bucket teeth?
Soil composition is one of the biggest factors in bucket teeth wear rates. Highly abrasive materials like granite, shale, and compacted rocky soil wear teeth far faster than clay or sandy loam. Trenching through mixed rock and debris is especially demanding on ground engaging tools. Operators working in abrasive conditions should shorten their inspection intervals and keep spare teeth on site to avoid unplanned machine downtime mid-project.
What causes premature failure of bucket teeth?
Premature failure usually comes down to a few avoidable issues: running teeth past the point of wear until the adapter itself is damaged, using a tooth style mismatched to the application, or neglecting locking pin and retainer condition. Impact-heavy work like demolition or breaking through rock can also crack teeth that are rated only for digging. Matching tooth material and profile to the actual ground conditions, and replacing worn retainers promptly, prevents most early failures.
How much do excavator bucket teeth cost?
Pricing for excavator bucket teeth depends on tooth size, material grade, and the quantity ordered. Standard teeth for smaller machines cost less per unit than heavy-duty or premium alloy teeth for larger excavators. Buying in bulk typically reduces per-unit cost significantly. For current pricing on teeth compatible with your machine size and application, request a quote directly from Earthmoving Warehouse to get accurate figures based on your specific requirements.


